They arrived about a week later, and we set a roommate date to start working on them. In the meantime, we gathered most of the materials we needed: wood glue, sandpaper, a drill and appropriate bit, clamps, and various tie-down straps. (Shout outs to Dad and Boyfriend for providing some of the necessary tools and Mom for delivering some of the supplies!) Much in the same way that I cannot follow a recipe exactly, I decided we were not going to follow the directions exactly either. Mostly, this just meant instead of buying 6 different grains of sand paper, ranging from 120 to 800 (or something equally ridiculous), we would buy two - fine and extra fine.

We began by sanding down the body and neck of the ukuleles.
 |
| Action shot! |
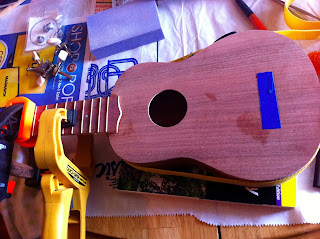
After that, we glued the neck to the body and used the tie-down straps to keep them pressed together.

We were supposed to wait to perform the next steps for something crazy, like 24 hours, but ain't nobody got time for that! We were able to rig the ukes so we could keep the necks drying against the bodies while also gluing the fretboards down to the necks. Before we could glue the fretboards on, though, we drilled the holes for the tiny mother of pearl dots. This was terrifying for me, because I was convinced I was going to mess it up. Also, Scott's drill weighs like 75 pounds. Note the terror on my face.
 |
| Slightly terrified I was going to ruin something or hurt myself |
We also taped off where the bridge would be placed after decorating, and left everything to dry for a day or so.

Now, let's be honest, most of the reason I wanted to make the ukulele myself was because I wanted to decorate it. We took a trip to Michael's to gather supplies. Stacey's inspiration was the striped side of a gift bag we have in the house. I decided I wanted purple paint, purple glitter, and orange flowers on mine. Because clearly I revel in simplicity. I've already received multiple comments on how people are surprised I didn't use orange glitter paint on the body. To be honest, I just didn't like the Krylon Glitter Blast shade of Orange Burst as much as the Grape Glitz.
A few days later, we spread out our decorating tools before us, taped off the neck of each uke, and got to work. Since I was using spray paint, I took mine outside, where I promptly gave the bushes in front of the porch a little more pizzazz.
 |
| Do YOUR shrubs sparkle? |
Stacey carefully taped off the body of her instrument using painters tape and different widths of washi tape we found at Michael's. I thought it was brilliant of her to label which color each strip of tape would be painted. It definitely kept things more organized as she continued to add color.


The flower stencils I bought were actually designed to be used on glass or plastic, so they were extra flexible and had a bit of adhesive on the back. I found this very useful. I cut up my stencils to use the flowers in a design that looked best on the body of my ukulele.


After letting them dry, we still had to attach the bridge, attach the tuning machines, and string the instruments. I found attaching the tuning machines with a tiny screwdriver to be incredibly difficult and frustrating. I thought this was supposed to be fun! I apologize to anyone I spoke with on the phone that night. I was Miss Super Cranky Pants. I was so frustrated by this process that I asked our guitar technician at work if he would finish attaching them and put on the strings for me. He obliged, and the angels sang from the heavens. My poor bruised palm rejoiced. Well as much as a hand can rejoice, I guess.
I brought my uke home after he finished it and promptly tried tuning it to learn some songs. The problem is that strings need time to stretch out after they're put on, and I wasn't being patient enough. I would tune the strings and start learning a song, and by the end of the song, the strings were out of tune again. I didn't really care because I was just excited to be learning new chords. After a few days, things leveled out quite a bit, and they sound pretty good now.
Stacey was at a workshop during the time I was finishing my instrument, so she finished it a few days later. So, without further ado, i would like to introduce you to the newest members of our instrument family:
Luke the Uke and UkuLeia
(Get it? Luke and Leia! Because they're ukuleles AND twins!)
 |
| Luke is on the left, Leia on the right. |
I'm so happy with the way they turned out! I have to admit that I was hoping for more instant gratification when putting the kits together. I wouldn't recommend building this particular kit with a classroom of kids, because it does take awhile, and there are some tricky parts that require dexterity and/or strength. I think there are some other kits out there that might be a little bit easier in that regard. But it was fun to build them and paint them, and now we're having fun learning how to play.
No comments:
Post a Comment